- Published on
Kubernetes with Cloudflare
- Authors

- Name
- Sunway
- 1 Expose service with Cloudflared
- 1.1 Install Cloudflared Client
- 1.2 Login to Cloudflare
- 1.3 Create Cloudflared Tunnel
- 1.4 Upload the Tunnel credentials file to Kubernetes
- 1.5 Associate Each Tunnel with a CNAME DNS record
- 1.6 Deploy cloudflared deployment and httpbin deployment
- 1.7 Test for httpbin
- 2 Nginx ingress whitelist with Cloudflare
- 2.1 Get nginx ingress helm chart
- 2.2 Set whitelist in pod annotations
- 2.3 Install nginx ingress
- 2.4 Test
- 3 Kubernetes with cloudflare load balance
- 3.1 Create Pool Probe
- 3.2 Create pool
- 3.3 Set Webhook or Email Alert in Cloudflare
- 3.4 Create load balancer
- 3.5 Test for LoadBalancer
This blog introduce 3 ways to use cloudflare with kubernetes
- Expose service with Cloudflared Tunnel
- Nginx whitelist ip with Cloudflare
- Kubernetes load balance with cloudflare
1 Expose service with Cloudflared
My kubernetes cluster has 5 nodes and 1 master, I will show how to expose services in 6 servers with cloudflared tunnel in this section.
NAME          STATUS   ROLES           AGE     VERSION   INTERNAL-IP     EXTERNAL-IP   OS-IMAGE             KERNEL-VERSION      CONTAINER-RUNTIME
k8s-master1   Ready    control-plane   7d      v1.30.0   10.0.0.1        <none>        Ubuntu 20.04.6 LTS   5.4.0-105-generic   containerd://1.6.31
k8s-node1     Ready    worker          6d23h   v1.30.0   10.0.0.2        <none>        Ubuntu 20.04.6 LTS   5.4.0-105-generic   containerd://1.6.31
k8s-node2     Ready    worker          6d23h   v1.30.0   10.0.0.3        <none>        Ubuntu 20.04.6 LTS   5.4.0-105-generic   containerd://1.6.31
k8s-node3     Ready    worker          6d23h   v1.30.0   10.0.0.4        <none>        Ubuntu 20.04.6 LTS   5.4.0-105-generic   containerd://1.6.31
k8s-node4     Ready    worker          6d23h   v1.30.0   10.0.0.5        <none>        Ubuntu 20.04.6 LTS   5.4.0-105-generic   containerd://1.6.31
k8s-node5     Ready    worker          6d23h   v1.30.0   10.0.0.6        <none>        Ubuntu 20.04.6 LTS   5.4.0-105-generic   containerd://1.6.31
Get more about CLOUDFLARE:what-is-cloudflare
1.1 Install Cloudflared Client
Execute command as below in each node (example in ubuntu)wget https://github.com/cloudflare/cloudflared/releases/latest/download/cloudflared-linux-amd64.deb
dpkg -i cloudflared-linux-amd64.deb
rm -f cloudflared-linux-amd64.deb
Get more releases: https://developers.cloudflare.com/cloudflare-one/connections/connect-networks/downloads/
1.2 Login to Cloudflare
Login to cloudflare in each node
cloudflared tunnel login
After Select a domain and confirm, get a certificate in ~/.cloudflared/cert.pem
1.3 Create Cloudflared Tunnel
In the example below, simply change k8snode1-tunnel to the name you wish to assign to your Tunnel.cloudflared tunnel create k8snode1-tunnel # (exec in node1)
# Tunnel credentials written to /Users/cf000197/.cloudflared/ef824aef-7557-4b41-a398-4684585177ad.json. cloudflared chose this file based on where your origin certificate was found. Keep this file secret. To revoke these credentials, delete the tunnel.
# Created tunnel example-tunnel with id ef824aef-7557-4b41-a398-4684585177ad
# cloudflared tunnel create k8snode2-tunnel (exec in node2)
# cloudflared tunnel create k8snode3-tunnel (exec in node3)
# cloudflared tunnel create k8snode4-tunnel (exec in node4)
# cloudflared tunnel create k8snode5-tunnel (exec in node5)
# cloudflared tunnel create k8stunnel (exec in master)
After create tunnel, get tunnel list by:
cloudflared tunnel list
You can obtain more detailed information for each tunnel with `cloudflared tunnel info <name/uuid>`
ID                                   NAME            CREATED              CONNECTIONS
xxxxxxxx-fedd-4325-919d-xxxxxxxxxxxx k8stunnel       2024-05-09T09:41:50Z 3xfra03, 2xfra06, 1xfra11, 1xfra12, 1xfra14
xxxxxxxx-93cc-42e4-a8e4-xxxxxxxxxxxx k8stunnel-node1 2024-05-10T01:44:08Z 1xfra03, 1xfra06, 3xfra07, 2xfra08, 1xfra10
xxxxxxxx-2ed0-46e4-b671-xxxxxxxxxxxx k8stunnel-node2 2024-05-10T01:45:43Z 1xfra03, 1xfra07, 1xfra08, 2xfra11, 1xfra12
xxxxxxxx-46cd-4717-af15-xxxxxxxxxxxx k8stunnel-node3 2024-05-09T09:53:28Z 2xfra03, 1xfra06, 2xfra07, 1xfra08, 1xfra11
xxxxxxxx-a9bc-4f28-a3ce-xxxxxxxxxxxx k8stunnel-node4 2024-05-10T01:46:40Z 2xfra06, 1xfra08, 3xfra11, 1xfra13, 1xfra14
xxxxxxxx-544b-4955-b041-xxxxxxxxxxxx k8stunnel-node5 2024-05-09T09:58:34Z 1xfra03, 1xfra06, 2xfra07, 2xfra08, 1xfra10
1.4 Upload the Tunnel credentials file to Kubernetes
Next, you will upload the generated Tunnel credential file as a secret to your Kubernetes cluster. You will also need to provide the filepath that the Tunnel credentials file was created under. You can find that path in the output of[ cloudflared tunnel create k8stunnel-node1 ] above.kubectl create secret generic tunnel-credentials-node1 --from-file=credentials.json=/Users/cf000197/.cloudflared/ef824aef-7557-4b41-a398-4684585177ad.json #(exec in node1)
# kubectl create secret generic tunnel-credentials --from-file=credentials.json=/Users/cf000197/.cloudflared/master.json (exec in master)
# kubectl create secret generic tunnel-credentials-node2 --from-file=credentials.json=/Users/cf000197/.cloudflared/node2.json (exec in node2)
# kubectl create secret generic tunnel-credentials-node3 --from-file=credentials.json=/Users/cf000197/.cloudflared/node3.json (exec in node3)
# kubectl create secret generic tunnel-credentials-node4 --from-file=credentials.json=/Users/cf000197/.cloudflared/node4.json (exec in node4)
# kubectl create secret generic tunnel-credentials-node5 --from-file=credentials.json=/Users/cf000197/.cloudflared/node5.json (exec in node5)
Get secret in cluster
kubectl get secret -n cloudflare
# tunnel-credentials         Opaque   1      6d22h
# tunnel-credentials-node1   Opaque   1      6d6h
# tunnel-credentials-node2   Opaque   1      6d6h
# tunnel-credentials-node3   Opaque   1      6d21h
# tunnel-credentials-node4   Opaque   1      6d6h
# tunnel-credentials-node5   Opaque   1      6d21h
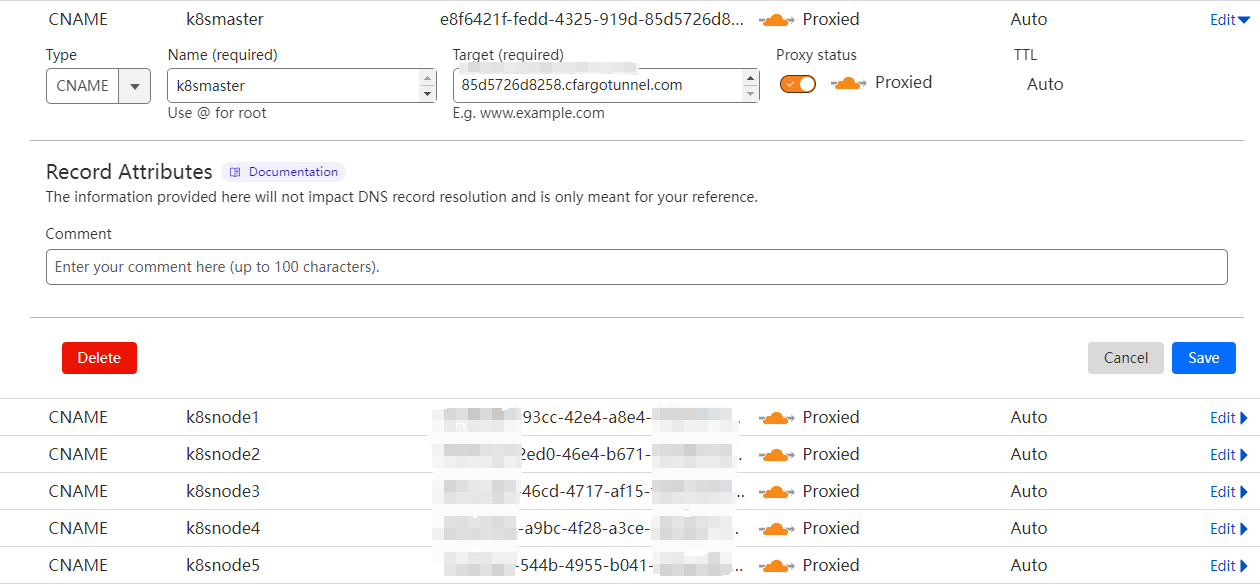
1.5 Associate Each Tunnel with a CNAME DNS record
- Go to the Cloudflare dashboard.
- Go to the DNS tab.
- Now create a CNAME targeting .cfargotunnel.com. In this example, the tunnel ID is ef824aef-7557-4b41-a398-4684585177ad, so create a CNAME record specifically targeting ef824aef-7557-4b41-a398-4684585177ad.cfargotunnel.com.
You can also create multiple CNAME records targeting the same Tunnel, if desired.
Alternatively, you can perform this step from the command line by running cloudflared tunnel route dns <tunnel> <hostname>. For example, cloudflared tunnel route dns example-tunnel tunnel.example.com. You can use a similar method to route traffic to cloudflared from a Cloudflare Load Balancer, see docs for details.
1.6 Deploy cloudflared deployment and httpbin deployment
Now, we’ll deploy cloudflared by applying its manifest. This will start a Deployment for running cloudflared and a ConfigMap with cloudflared’s config. When Cloudflare receives traffic for the DNS or Load Balancing hostname you configured in the previous step, it will send that traffic to the cloudflared instances running in this deployment. Then, those cloudflared instances will proxy the request to your application’s Service.
1: If you use official manifest, update container image from
cloudflare/cloudflared:2022.3.0tocloudflare/cloudflared:2024.4.12: Exec
kubectl get nodes --show-labelsto setnodeAffinityas below3: If you want to deploy in master, remove taint in master node:
kubectl taint nodes <master-node-name> contorl-plane.kubernetes.io:NoSchedule-4: Recommend: Create a namespace and set a namespace in yaml before deploy:
kubectl create namespace cloudflare5: Modify
hostnamein eachConfigMap6: Modify
Secret NameandConfigMap Nameas below7: Only example yaml for
master.yamlandnode1.yaml, you can addnode2, node3, node4, node5yaml configuration as below
---
# master.yaml
apiVersion: apps/v1
kind: Deployment
metadata:
  namespace: cloudflare
  name: cloudflared-master1
spec:
  selector:
    matchLabels:
      app: cloudflared
  replicas: 2
  template:
    metadata:
      labels:
        app: cloudflared
    spec:
      containers:
        - name: cloudflared-master1
          image: cloudflare/cloudflared:2024.4.1
          args:
            - tunnel
            - --config
            - /etc/cloudflared/config/config.yaml
            - run
          livenessProbe:
            httpGet:
              path: /ready
              port: 2000
            failureThreshold: 1
            initialDelaySeconds: 10
            periodSeconds: 10
          volumeMounts:
            - name: config-master1
              mountPath: /etc/cloudflared/config
              readOnly: true
            - name: creds-master1
              mountPath: /etc/cloudflared/creds
              readOnly: true
      volumes:
        - name: creds-master1
          secret:
            secretName: tunnel-credentials
        - name: config-master1
          configMap:
            name: cloudflared-master1
            items:
              - key: config.yaml
                path: config.yaml
      affinity:
        nodeAffinity:
          requiredDuringSchedulingIgnoredDuringExecution:
            nodeSelectorTerms:
              - matchExpressions:
                  - key: contorl-plane.kubernetes.io/role
                    operator: In
                    values:
                      - master1
---
apiVersion: v1
kind: ConfigMap
metadata:
  name: cloudflared-master1
  namespace: cloudflare
data:
  config.yaml: |
    tunnel: k8stunnel
    credentials-file: /etc/cloudflared/creds/credentials.json
    metrics: 0.0.0.0:2000
    no-autoupdate: true
    ingress:
      - hostname: k8smaster.example.com
        service: http://web-service:80
      - service: http_status:404
---
# node1.yaml
apiVersion: apps/v1
kind: Deployment
metadata:
  namespace: cloudflare
  name: cloudflared-node1
spec:
  selector:
    matchLabels:
      app: cloudflared
  replicas: 2
  template:
    metadata:
      labels:
        app: cloudflared
    spec:
      containers:
        - name: cloudflared-node1
          image: cloudflare/cloudflared:2024.4.1
          args:
            - tunnel
            - --config
            - /etc/cloudflared/config/config.yaml
            - run
          livenessProbe:
            httpGet:
              path: /ready
              port: 2000
            failureThreshold: 1
            initialDelaySeconds: 10
            periodSeconds: 10
          volumeMounts:
            - name: config-node1
              mountPath: /etc/cloudflared/config
              readOnly: true
            - name: creds-node1
              mountPath: /etc/cloudflared/creds
              readOnly: true
      volumes:
        - name: creds-node1
          secret:
            secretName: tunnel-credentials-node1
        - name: config-node1
          configMap:
            name: cloudflared-node1
            items:
              - key: config.yaml
                path: config.yaml
      affinity:
        nodeAffinity:
          requiredDuringSchedulingIgnoredDuringExecution:
            nodeSelectorTerms:
              - matchExpressions:
                  - key: node-role.kubernetes.io/worker
                    operator: In
                    values:
                      - node1
---
apiVersion: v1
kind: ConfigMap
metadata:
  namespace: cloudflare
  name: cloudflared-node1
data:
  config.yaml: |
    tunnel: k8stunnel-node1
    credentials-file: /etc/cloudflared/creds/credentials.json
    metrics: 0.0.0.0:2000
    no-autoupdate: true
    ingress:
    - hostname: k8snode1.example.com
      service: http://web-service:80
    - service: http_status:404
---
# app.yaml
apiVersion: apps/v1
kind: Deployment
metadata:
  namespace: cloudflare
  name: httpbin-deployment
spec:
  selector:
    matchLabels:
      app: httpbin
  replicas: 2
  template:
    metadata:
      labels:
        app: httpbin
    spec:
      containers:
      - name: httpbin
        image: kennethreitz/httpbin:latest
        ports:
        - containerPort: 80
---
apiVersion: v1
kind: Service
metadata:
  namespace: cloudflare
  name: web-service
spec:
  selector:
    app: httpbin
  ports:
    - protocol: TCP
      port: 80
After config your own configuration:
alias kapply="kubectl apply -f"
kapply master.yaml
kapply node1.yaml
kapply node2.yaml
kapply node3.yaml
kapply node4.yaml
kapply node5.yaml
kapply app.yaml
alias kget="kubectl get"
kget all -n cloudflare
NAME                                       READY   STATUS    RESTARTS        AGE    IP              NODE          NOMINATED NODE   READINESS GATES
pod/cloudflared-master1-69bfc48b46-qxshx   1/1     Running   0               6d2h   10.169.225.4    k8s-master1   <none>           <none>
pod/cloudflared-master1-69bfc48b46-zdgfj   1/1     Running   0               6d2h   10.169.225.5    k8s-master1   <none>           <none>
pod/cloudflared-node1-59794c75bf-bcd82     1/1     Running   0               6d4h   10.47.156.72    k8s-node1     <none>           <none>
pod/cloudflared-node1-59794c75bf-mm5lw     1/1     Running   0               6d4h   10.47.156.73    k8s-node1     <none>           <none>
pod/cloudflared-node2-6c95b654dc-qqpzf     1/1     Running   0               6d4h   10.109.131.6    k8s-node2     <none>           <none>
pod/cloudflared-node2-6c95b654dc-wwcd9     1/1     Running   0               6d4h   10.109.131.5    k8s-node2     <none>           <none>
pod/cloudflared-node3-5b6b88774f-btqjp     1/1     Running   0               6d4h   10.177.12.198   k8s-node3     <none>           <none>
pod/cloudflared-node3-5b6b88774f-ss6gx     1/1     Running   0               6d4h   10.177.12.199   k8s-node3     <none>           <none>
pod/cloudflared-node4-857b4c67f5-qpp8q     1/1     Running   0               6d4h   10.194.122.69   k8s-node4     <none>           <none>
pod/cloudflared-node4-857b4c67f5-s54md     1/1     Running   0               6d4h   10.194.122.70   k8s-node4     <none>           <none>
pod/cloudflared-node5-59765c5997-9tjsv     1/1     Running   1               6d4h   10.239.187.8    k8s-node5     <none>           <none>
pod/cloudflared-node5-59765c5997-p4drd     1/1     Running   0               6d4h   10.239.187.7    k8s-node5     <none>           <none>
pod/httpbin-deployment-699f86ff7-qmkkr     1/1     Running   0               6d6h   10.177.12.195   k8s-node2     <none>           <none>
pod/httpbin-deployment-699f86ff7-xhdr9     1/1     Running   0               6d6h   10.47.156.66    k8s-node1     <none>           <none>

NAME                  TYPE        CLUSTER-IP       EXTERNAL-IP   PORT(S)   AGE    SELECTOR
service/web-service   ClusterIP   10.110.224.124   <none>        80/TCP    6d6h   app=httpbin

NAME                                  READY   UP-TO-DATE   AVAILABLE   AGE    CONTAINERS            IMAGES                            SELECTOR
deployment.apps/cloudflared-master1   2/2     2            2           6d2h   cloudflared-master1   cloudflare/cloudflared:2024.4.1   app=cloudflared
deployment.apps/cloudflared-node1     2/2     2            2           6d4h   cloudflared-node1     cloudflare/cloudflared:2024.4.1   app=cloudflared
deployment.apps/cloudflared-node2     2/2     2            2           6d4h   cloudflared-node2     cloudflare/cloudflared:2024.4.1   app=cloudflared
deployment.apps/cloudflared-node3     2/2     2            2           6d4h   cloudflared-node3     cloudflare/cloudflared:2024.4.1   app=cloudflared
deployment.apps/cloudflared-node4     2/2     2            2           6d4h   cloudflared-node4     cloudflare/cloudflared:2024.4.1   app=cloudflared
deployment.apps/cloudflared-node5     2/2     2            2           6d4h   cloudflared-node5     cloudflare/cloudflared:2024.4.1   app=cloudflared
deployment.apps/httpbin-deployment    2/2     2            2           6d6h   httpbin               kennethreitz/httpbin:latest       app=httpbin

NAME                                             DESIRED   CURRENT   READY   AGE    CONTAINERS            IMAGES                            SELECTOR
replicaset.apps/cloudflared-master1-69bfc48b46   2         2         2       6d2h   cloudflared-master1   cloudflare/cloudflared:2024.4.1   app=cloudflared,pod-template-hash=69bfc48b46
replicaset.apps/cloudflared-node1-59794c75bf     2         2         2       6d4h   cloudflared-node1     cloudflare/cloudflared:2024.4.1   app=cloudflared,pod-template-hash=59794c75bf
replicaset.apps/cloudflared-node2-6c95b654dc     2         2         2       6d4h   cloudflared-node2     cloudflare/cloudflared:2024.4.1   app=cloudflared,pod-template-hash=6c95b654dc
replicaset.apps/cloudflared-node3-5b6b88774f     2         2         2       6d4h   cloudflared-node3     cloudflare/cloudflared:2024.4.1   app=cloudflared,pod-template-hash=5b6b88774f
replicaset.apps/cloudflared-node4-857b4c67f5     2         2         2       6d4h   cloudflared-node4     cloudflare/cloudflared:2024.4.1   app=cloudflared,pod-template-hash=857b4c67f5
replicaset.apps/cloudflared-node5-59765c5997     2         2         2       6d4h   cloudflared-node5     cloudflare/cloudflared:2024.4.1   app=cloudflared,pod-template-hash=59765c5997
replicaset.apps/httpbin-deployment-699f86ff7     2         2         2       6d6h   httpbin               kennethreitz/httpbin:latest       app=httpbin,pod-template-hash=699f86ff7
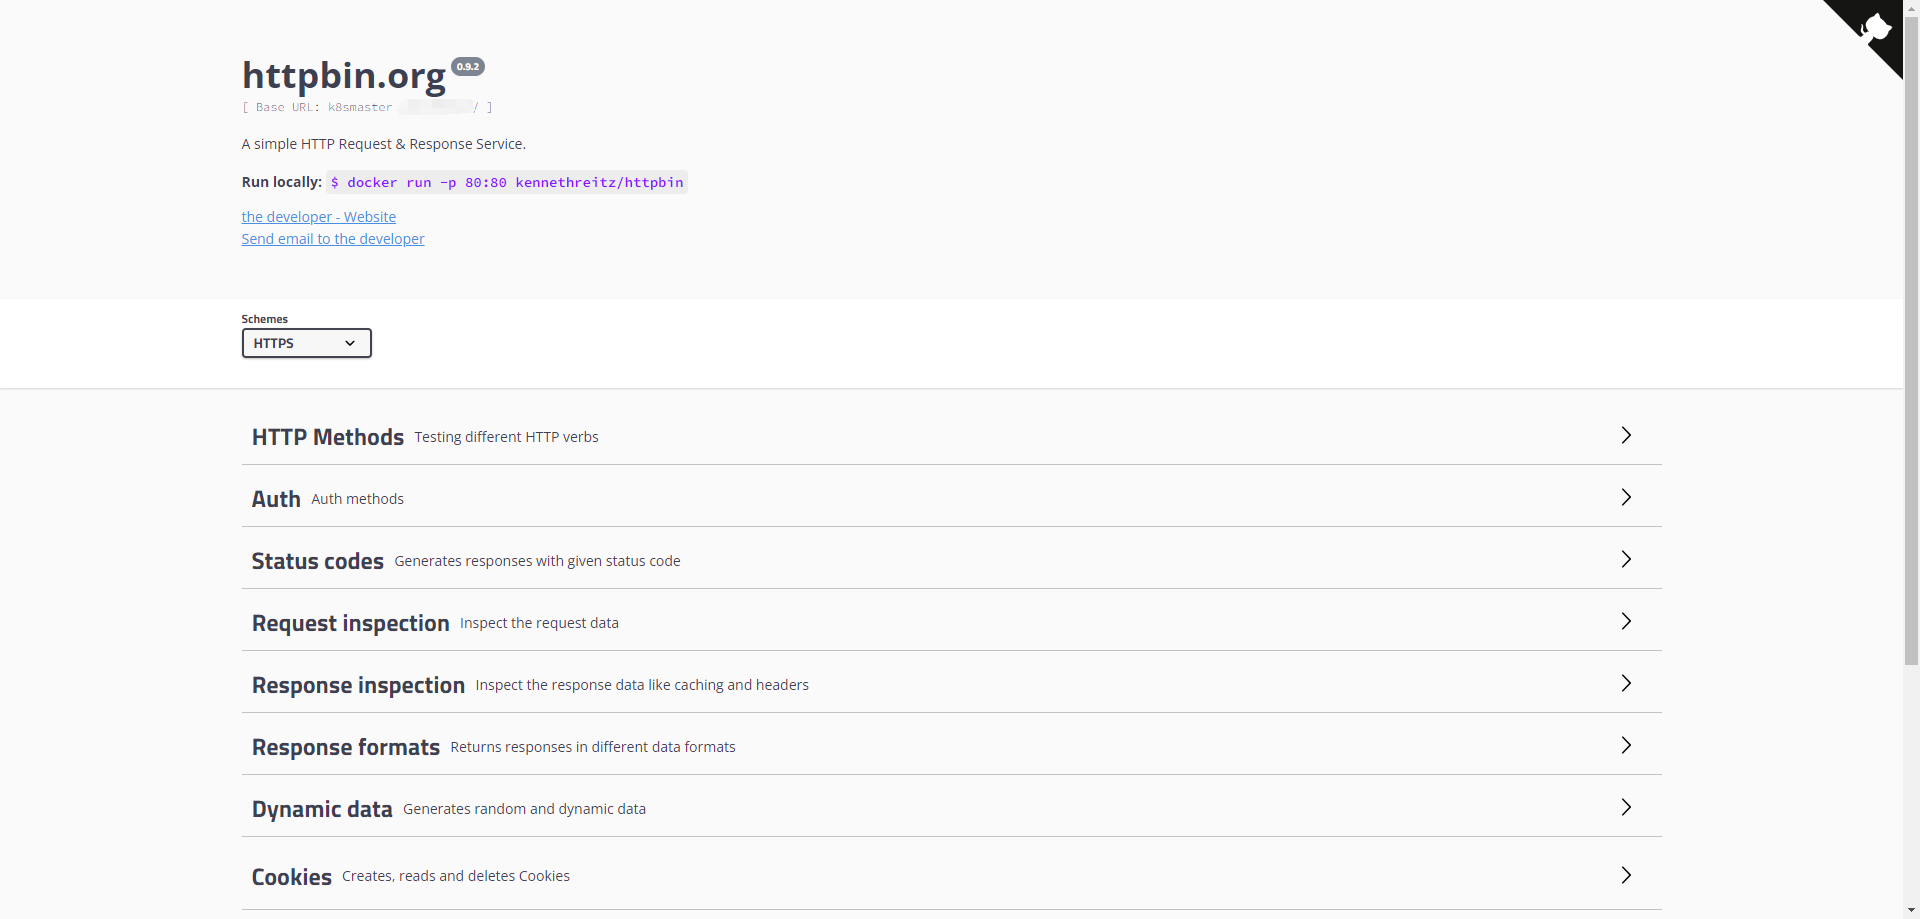
1.7 Test for httpbin
Now access to k8smaster.example.com, k8snode1.example.com, k8snode2.example.com...
you can get content like that:
2 Nginx ingress whitelist with Cloudflare
When a domain proxy by cloudflare, we can get a whitelist from cloudflare
2.1 Get nginx ingress helm chart
Install helm in ubuntu#
curl https://baltocdn.com/helm/signing.asc | gpg --dearmor | sudo tee /usr/share/keyrings/helm.gpg > /dev/null
sudo apt-get install apt-transport-https --yes
echo "deb [arch=$(dpkg --print-architecture) signed-by=/usr/share/keyrings/helm.gpg] https://baltocdn.com/helm/stable/debian/ all main" | sudo tee /etc/apt/sources.list.d/helm-stable-debian.list
sudo apt-get update
sudo apt-get install helm
helm pull oci://ghcr.io/nginxinc/charts/nginx-ingress --untar --version 1.2.1
cd nginx-ingress
kubectl apply -f crds/
kubectl apply -f https://raw.githubusercontent.com/nginxinc/kubernetes-ingress/v3.5.1/deploy/crds.yaml
kubectl create namespace nginx-ingress
vim values.yaml
# In this blog: set [ controller.hostNetwork=true ] in values.yaml for test

#controller.service.type=LoadBalancer, domain --> cloud vendor load balance-->NodePort
#controller.service.type=NodePort,     domain --> proxy service --> NodePort
#controller.hostPort.enabled=true,     domain --> node:80/443
2.2 Set whitelist in pod annotations
vim values.yaml
pod:
  ## The annotations of the Ingress Controller pod.
  annotations:
    nginx.ingress.kubernetes.io/whitelist-source-range: "173.245.48.0/20, 103.21.244.0/22, 103.22.200.0/22, 103.31.4.0/22, 141.101.64.0/18, 108.162.192.0/18, 190.93.240.0/20, 188.114.96.0/20, 197.234.240.0/22, 198.41.128.0/17, 162.158.0.0/15, 104.16.0.0/13, 104.24.0.0/14, 172.64.0.0/13, 131.0.72.0/22, 2400:cb00::/32, 2606:4700::/32, 2803:f800::/32, 2405:b500::/32, 2405:8100::/32, 2a06:98c0::/29, 2c0f:f248::/32"
You can also set iptables in server instead of annotations
# iptables in ubuntu
sudo apt-get install ipset -y
sudo ipset create cloudflare hash:net
sudo ipset create cloudflare6 hash:net family inet6
for ip in $(curl https://www.cloudflare.com/ips-v4); do sudo ipset add cloudflare $ip; done
for ip in $(curl https://www.cloudflare.com/ips-v6); do sudo ipset add cloudflare6 $ip; done

sudo iptables -I INPUT 1 -p tcp --dport 80 -m set --match-set cloudflare src -j ACCEPT
sudo iptables -I INPUT 1 -p tcp --dport 443 -m set --match-set cloudflare src -j ACCEPT
sudo iptables -A INPUT -p tcp --dport 80 -j DROP
sudo iptables -A INPUT -p tcp --dport 443 -j DROP

sudo ip6tables -I INPUT 1 -p tcp --dport 443 -m set --match-set cloudflare6 src -j ACCEPT
sudo ip6tables -I INPUT 1 -p tcp --dport 80 -m set --match-set cloudflare6 src -j ACCEPT
sudo ip6tables -A INPUT -p tcp --dport 80 -j DROP
sudo ip6tables -A INPUT -p tcp --dport 443 -j DROP

iptables -L INPUT --line-numbers
ip6tables -L INPUT --line-numbers

# iptables -D INPUT $line-numbers
# ip6tables -D INPUT $line-numbers
2.3 Install nginx ingress
helm -n nginx-ingress install ngxingress oci://ghcr.io/nginxinc/charts/nginx-ingress --version 1.2.1
2.4 Test
Now, only traffic proxy by cloudflare can access to you server
You can set a subdomain proxy by cloudflare and a subdomain do not proxy by cloudflare for testing
3 Kubernetes with cloudflare load balance
Must subscribe load balancing service at first: https://developers.cloudflare.com/load-balancingFor example, I have 4 k8s cluster in London, Singapore, HongKong and SiliconValley, I can set each cluster entrance in cloudflare load balance to make Global-LB.
The system architecture can be illustrated as below
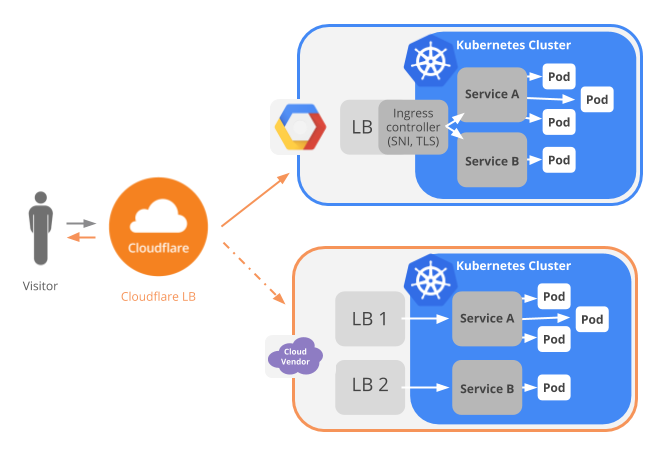
Get more info: https://www.cloudflare.com/integrations/kubernetes/
3.1 Create Pool Probe
Create a probe for cluster entrance as below: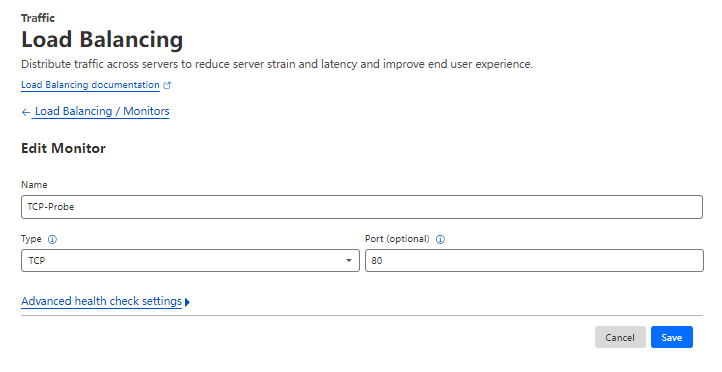
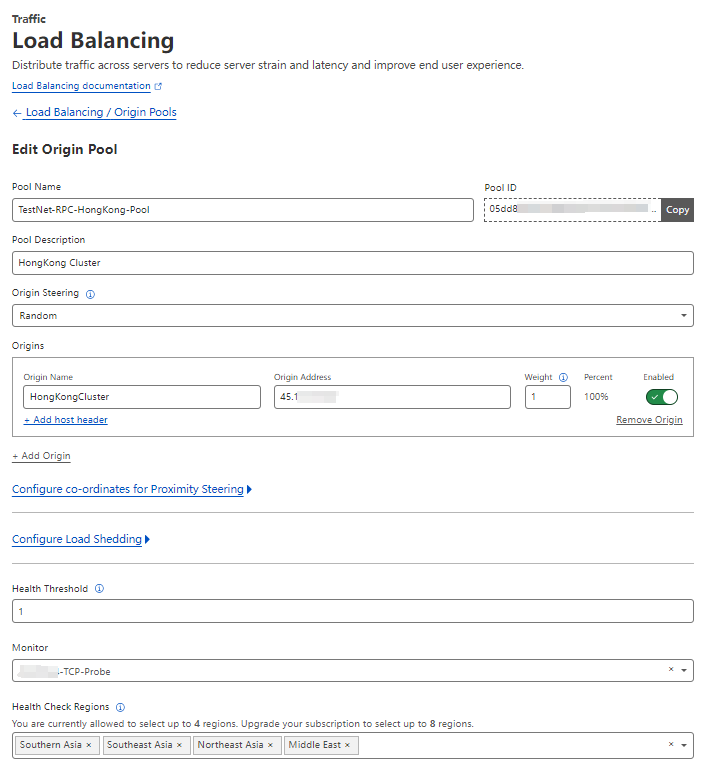
3.2 Create pool
Now, you can create 4 pools for for each cluster entrance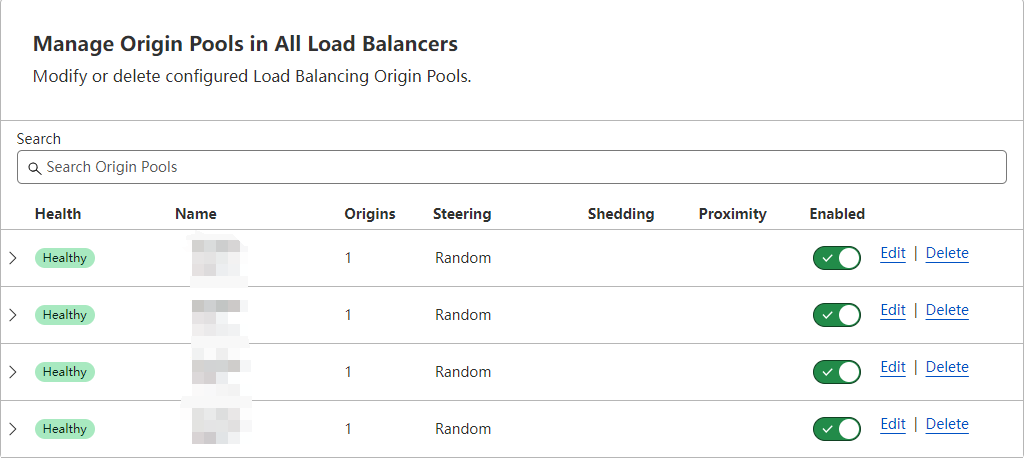
3.3 Set Webhook or Email Alert in Cloudflare
Generate webhook in slack, lark, teams ...How to config webhook and email alert in cloudflare
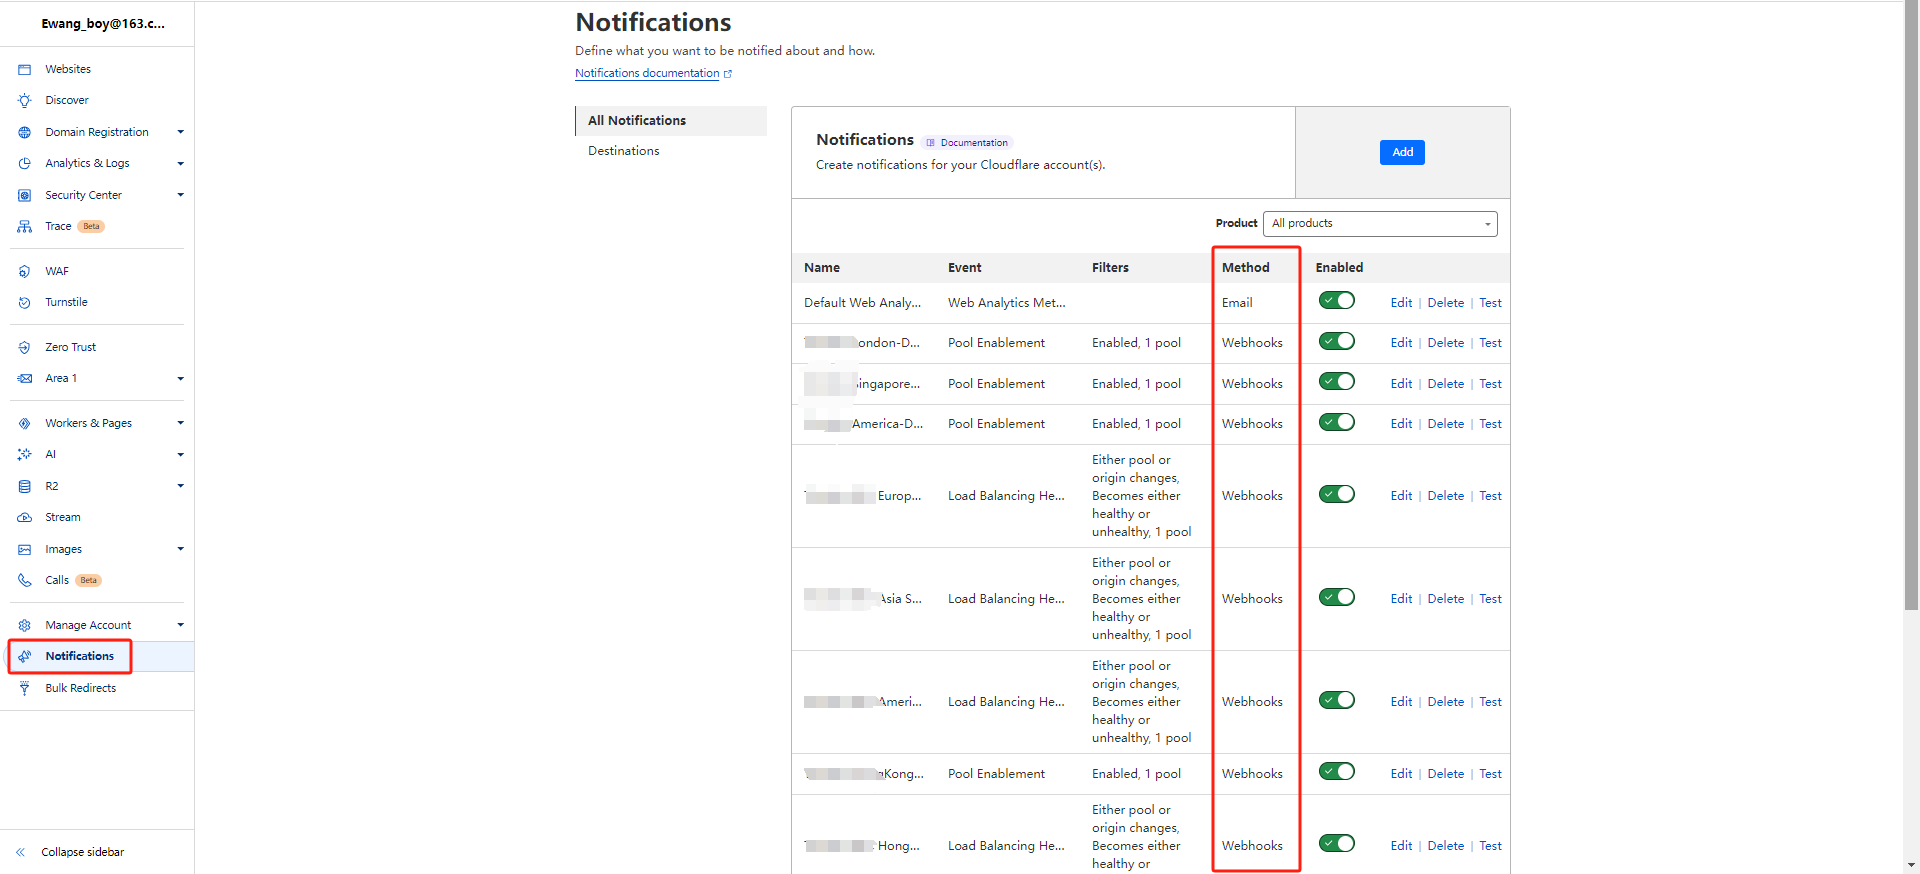
After config webhook or email successfully, you can create A Health Alert and a Pool Enablement Alert Manage in each pool

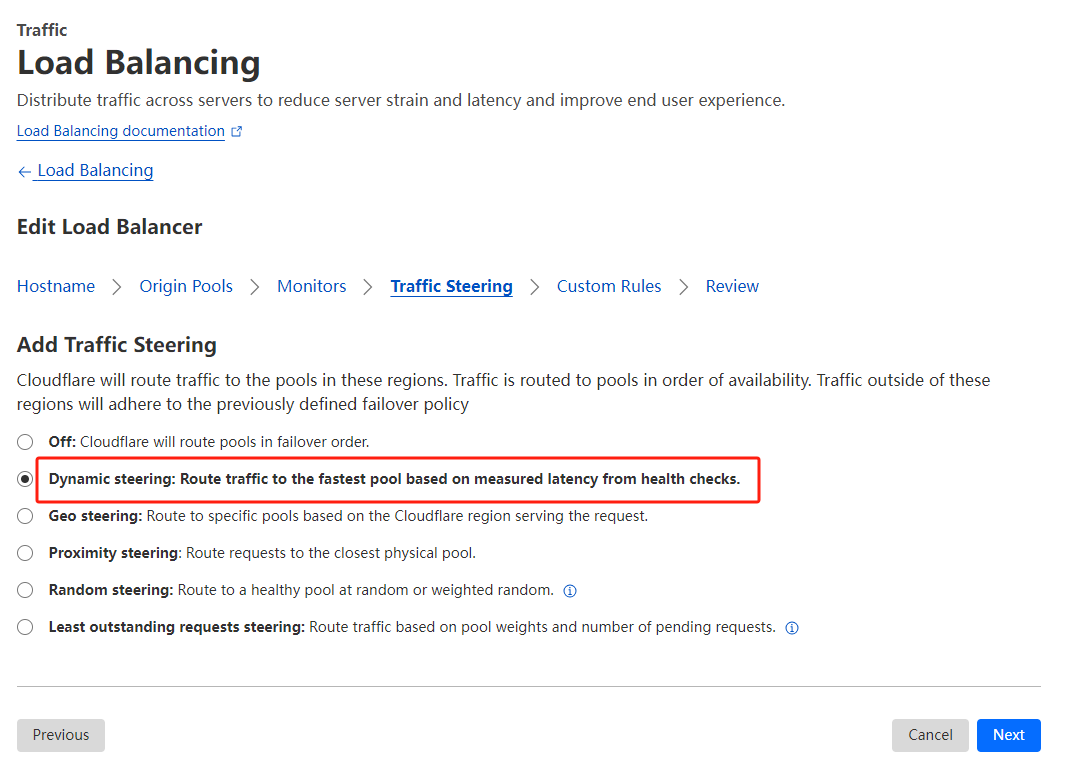
3.4 Create load balancer
Create a load balancer as below: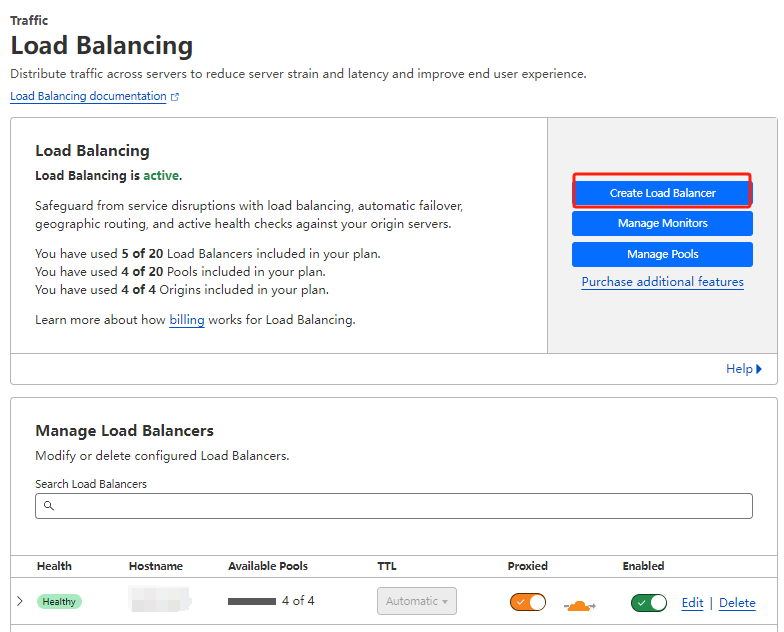
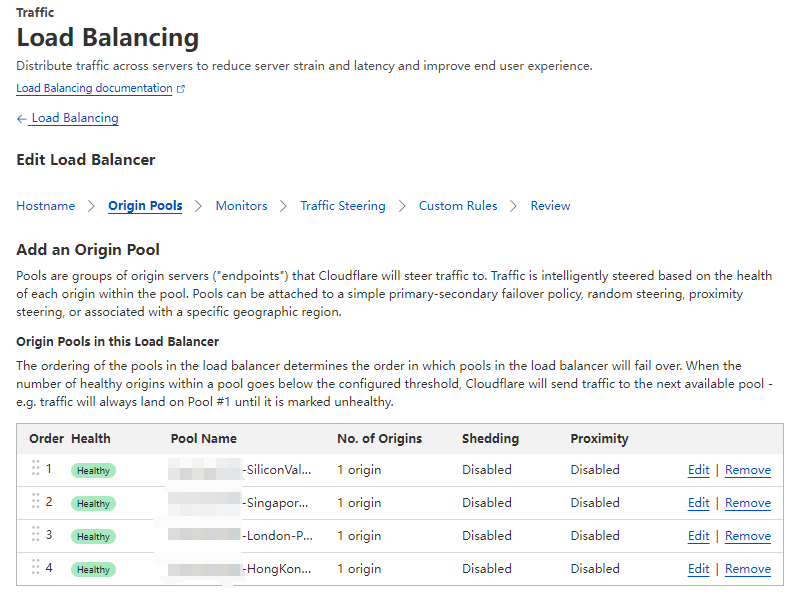
I easily set traffic steering to: Dynamic steering: Route traffic to the fastest pool based on measured latency from health checks.
3.5 Test for LoadBalancer
Now, user can access to my service according to the health checks latency from all over the world